Showing posts with label Sharpen a Circular Saw Blade. Show all posts

Sunday, May 15, 2011

Saw Blade Face Grinding

More saws are literally butchered by facing improperly than by any other grinding operation. In the first place, when a saw is first manufactured it has cutting geometry that is designed to perform a certain way. When a customer buys a saw for a specific purpose and it performs to his satisfaction, it now becomes the responsibility of the sharpener to see to it that it does as good a job after servicing as it did before. This means that there can be no changes made in the original geometry of the saw.

Now getting back to the facing operation. Most saws are ruined by facing when the person doing it is not careful and does not grind the face of the tooth parallel with the back and changes the geometry by dubbing the top part of the face back, thus changing the hook angle of the tooth. See the illustration below.

face_grinding-2.jpg

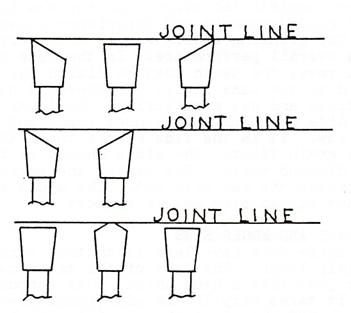
The next thing that is too often done wrong is not grinding the same amount off of each tooth face. This causes the saw to lose its joint by making some teeth higher than others and some teeth wider than others. Study the illustrations below. Note how tops of teeth become out of joint when improperly faced.

face_grinding-3.jpg

Note how sides also vary when saws are improperly faced.

You may say that these drawings are misleading because they are exaggerated to prove a point. The first thing to be aware of is that chip load per tooth on cutoff saws is down in the area of .002 to .004 thousandths of an inch. Now you have but to dial indicate the tops and sides to see what variation any given saw has.

If a saw varies on the top even as much as .002 thousandths the tooth directly behind the low tooth will be loaded that much more than it should be or than the saw was designed for. These variations do not have to be very large before you begin to wonder why an 80 tooth saw is necessary for a job when only 40 teeth are working.

The sides of the saw are also affected in the same way and the performance will fall off rapidly when the saw is merely improperly faced. Be assured that there is no substitute for a job done accurately and consistently right. Most face grinding is performed on a gumming type machine that is a hand operation and completely at the mercy of the operator. This requires the operator to have a good feel for the job and a thorough understanding of its basics. Proper set up to face the saw is very important and should not be done in a slipshod manner. See the illustration below.

face_grinding-4.jpg

After a diamond facing wheel has been used for a while, it becomes rounded over from extending down beyond the carbide and grinding into the steel below. The steel tends to pull the diamond out of the bond causing this rounded condition. When the wheel gets into this condition it is necessary to compensate or dress the wheel face flat again. Most people do not want to dress away their diamond so they go right on butchering their saws and sending out disgraceful work to their customers. This really opens the door for their competition. Refer to the drawing below.

face_grinding-5.jpg

If you must relieve the backing behind the diamond in order to do a saw with narrow gullets, you must be very careful. It is far better to buy a narrower diamond wheel with 1/32 inch diamond thickness for doing saws with narrow gullets. A well maintained facing wheel will save a lot of time and do a better job.

Treat the facing of a carbide saw like a highly precision grinding job and try to do it better each time you do it.

Saw Blade Side Grinding

The side grinding of carbide saws is the most critical grinding operation as it relates to the saw's performance. The angles ground in the side are not as important as the uniformity of the grinding job. The most common angles on the sides are 2° dish and 3° back for general purpose use on nearly all wood-cutting saws, 2 ° dish and 1 ° back on metal and plastic-cutting saws, and no dish and 4° back for smooth cutting rip saw applications. Most carbide saw grinders do not pay enough attention and are not aware that this operation must be done properly. Following is a sequence grinding operation that may help explain the major problems. Top Grinding and Face Grinding also play an important role on the Cutting ability of the saw blade.

side_grinding-1.jpg

The condition described in the preceeding drawing is what causes most of the saw grinding problems. Without the point extending the farthest out on the sides, the saw has to cut without a point on the sides. This causes it to cut rough and lead off and require more power to operate. It can also cause burning and make the saw wobble. It cannot be stressed enough to guard against this condition. Machines that are weak and tired will exaggerate this problem and are very hard to live with if you need any production off of them.

The next thing to watch is the plate springing away from the wheel. This is caused when the plate support is too far away from the tip. It will affect thin saws far more than heavy ones. On very thin plates it is sometimes necessary to provide support directly behind the carbide tip to prevent it from pushing away from the wheel.

Diamond wheels are also culprits that cause bad side grinding. The wheels should be soft enough to cut freely and should be not less than 75 concentration. The diamond section should be no more than 1/16" wide so that it does not exert as much pressure as a wider section would.

Reducing the amount of stock removal and allowing the wheel to cut clean and spark out will also help.

A simple inspection can be accomplished by holding a rule on the side of the tip and looking toward a bright light. See if the rule will rock on the tooth or if you can see light at both ends of the tooth under the rule.

The sides must be ground accurately and the correct angle ground so the saw can perform satisfactorily. If you are not sure of the angles on the side of a tooth, you can find them by a simple method of using a black felt ink pen and very lightly touching the wheel to the tip. Then adjust angles carefully until you wipe off the whole side of the inked tooth.

Saws that have been in service and exposed to abrasion and wear should be examined on the sides carefully and if wear is present it is frequently necessary to lightly dress the sides to bring them up to a sharp corner and restore their original cutting ability.

It should be noted here that if a saw is returned to your shop dull, it should be sharpened well enough to go back into service and give the same cut quality and service life as it did when it was new. Anything less than this is a poor sharpening job. Sometimes as saws are returned for sharpening frequently and in very dull condition, a good thorough sharpening job each time will shorten their life expectancy because of the necessity of removing carbide all over each time they are serviced. Remember, however, that it is better to have to apologize for a new saw wearing out too soon than to apologize for one that does not cut properly and does not go back on the job in first class condition.

Keep your eyes on the sides.

article by http://www.carbideprocessors.com/

Saw Blade Top Grinding

Here is simple tips how to Saw Blade Tip Grinding with correctly, Top Grinding is very important to the saw blade as it affects the tooth load, and if done poorly will cause the saw blade to cut very badly.

This operation must be done with a good solid index finger that does not spring when the tooth is forced against it. If the finger springs or moves differently each time a tooth is ground, the teeth will vary in height and create a variation in tooth load. If the tooth height varies, you again will have to ask yourself why you have so many teeth in the saw.

Assuring uniform tooth load is the major function of the tops of the teeth, therefore they must be accurately ground for correct geometry and height, and the grinding finish must be of good quality.

Several things affect good top grinding. The most important is the finger. Next most important is the wheel. Third most important would be the operator doing the grinding. A good rigid grinding machine is absolutely necessary and should be equipped with an accurate ball bearing saw holder.

In order to get good results on the outside of the saw, you must have an accurate hole or eye in the saw to start with. No saw bore should be over .002 thousandths of an inch over the nominal size of the bore. Even with close tolerance bores you must have the shaft the saw rotates on accurate and on size. The biggest problem, as it relates to bores and the eye of the saw, is bushings that are used to reduce a bore to fit the grinder arbor. It is impossible to grind a saw properly if the saw is turned on the bushing. You may start out new and do fairly well, but the bushings will begin to wear and your tolerance will disappear fast.

The better way is to bush the saw down with a bushing that has a bore which closely fits the shaft, and an outside which tapers very slightly, about .006 thousandths of an inch in 3/16" of bushing length. This will assure a good seat on the bushing O.D. which locates well down into the bore.

Now you must turn this saw and bushing combination on a ball bearing spindle so you do not create wear on the bushing. The very best way to prove you have a good set-up and an accurate one is to grind the saw and then dial the O.D. carefully. Mark any slight variations on the saw in the location they occur. Now remove the saw and bushing from the arbor. Again install the saw the way you did the first time and dial the O.D. again. If you do not repeat exactly, you have your answer, and also know how much your error is.

Runout on the O.D. of a rip saw is not nearly as critical as on a cut-off saw because of the large tooth load. Some service shops are aware of this and get sloppy in their work. It still takes no longer to do a good job than a poor one, and service people should get oriented into this routine.

The biggest assets you can have in top grinding are 1) a good accurate rugged machine to grind on, 2) a good solid index finger that absolutely does not yield when pressure is applied to it, 3) an accurate bushing system to center the saw properly, 4) a ball bearing spindle for the saw to revolve on, and 5) the desire to do a good job and improve your work at all times.

top_grinding.jpg

When top grinding, all tooth styles should be dial indicated on top to assure proper tooth height and proper joint.

article by http://www.carbideprocessors.com/

Tuesday, May 10, 2011

Guide to Sharpening Carbide Saw Blade

Trim and Cutoff Saws

These saws have light tooth loads and the extreme outside corner of the tooth must cut through the grain fiber without disturbing it any more than necessary. This means that the uniformity of the chip load is very important. If you refer to the section in this manual on facing, you will note that it plays a key role in trim saw performance. Refer to the industrial Saw Blade Section or the Saw Blade Sharpening Index for related articles.

The hook or rake angle must be maintained and a uniform amount of carbide removed from the face of each tooth.

A good rule of thumb is to try and maintain at least 95% efficiency of the saw. If a saw has 100 teeth, no more than 5 teeth can be out of the cut due to broken teeth or irregular grinding. These must be staggered around the saw. If the corner teeth have very small corner breaks, these teeth will probably come back into the cut after the saw has been sharpened once or twice. If you don't want these small nicked teeth to show, they can be ground down on the top until the nick is gone. They will still come back into the cut after additional sharpenings.

Of course, the very best way to service is to shoot for 100%. No trim saw should be faced more than twice without going over the sides and tops. Sometimes it is necessary to do the complete job every time the saw is serviced. This is where good judgement and experience comes into play.

Top grinding a trim saw is also very important to the saw's overall performance. In the case of the Alternate Bevel saws, the teeth must be dialed the same height and ground to the same angle. If they are not, the saw will lead off track and cut erratically.

Concentricity is a must. Side Grinding is the most important grinding done on a trim saw. It is the side of the tooth that has to sheer the cross grain fiber. The sides should be finished with a very fine diamond wheel. The better the surface finish on the sides, the better the saw will cut. The sides must also be straight and not dubbed over on the corners.

Rip Saws and Edger Saws

These saws have less teeth than trim saws and also heavier chip loads. The tops of the teeth cut across the grain fiber just like a hand chisel cuts across the grain fiber.

It takes very little additional power for a rip saw to have a .020 chip load than a .040 chip load. The tooth still has to sheer all the way across the top of the tooth, regardless of the tooth load. The sides of rip saw teeth get very little action. They wear themselves dull by rubbing the sides of the cut.

The more hook or rake a rip tooth has, the easier it penetrates the cross grain fiber. The more back clearance on the tooth, the easier the tooth also penetrates.

In the case of carbide; it is necessary to limit the included angle on the tops of the teeth to prevent carbide breackage. Tougher grades of carbide are required on most rip operations, due to shock from heavy chip loads and knots. Face grinding properly is very important and the hook or rake angle must be maintained and the faces not dubbed over on the outer portion of the face. It is also very important that an equal amount of carbide is removed from each face in order to keep the saw in joint and the chip load uniform.

Top grinding is the most important grinding job done on a rip saw. The keener the cutting edge, the easier the saw will penetrate the grain fiber and the less power is required. The finer the surface finish on the tops, the better the overall performance including time between sharpenings.

Side grinding is important as it relates to the finish on the sides of the cut. All teeth must be kept in joint so that deep scratches and revolution marks do not adversely effect the cut quality.

All the teeth in a rip saw must cut uniformly and it is not wise to take any teeth out of the cut. The tooth loads are heavy and the removal of one tooth loads the following tooth far too much for comfort.

Aluminum and Metal Saws

The tooth load on metal saws is light to medium and in the range of .001" to .005". Facing-Topping and Side grinding are all of equal importance since they all play a vital role in the saw's performance.

Facing should be straight and true and a very fine finish is important. The face of the tooth is forming the chip and if it is not smooth, the chip will seize or freeze on the face. Chips that are deposited on the face of the tooth must go around again and attempt to form a chip with the deposited metal instead of the tooth face. Good lubrication helps prevent this chip galling, but a smooth face is also essential.

Top grinding must be done accurately, so the chip load is uniform. The surface finish on the tops should be very smooth so that a very sharp corner enters the cut and not a ragged edge caused by rough grinding.

Side grinding is of equal importance in order to obtain a smooth cut on the sides of the cut. Here again, the smoother the surface finish, the better the cut.The two most important operations in servicing a carbide saw are:

#1 - accuracy

# 2 - the surface finish on the carbide. You just can't compromise and expect consistent results.

Article by Lowell Freeborn

When to Sharpen Saw Blades?

As a rule of thumb never let your blades get duller than 0.008” (8/1,000 inches) edge radius. Certain grades of carbide are able obtain and keep a sharper tip than others.

This may not sound that dull but it is like trying to cut with the edge of a paper clip. A much better figure for maximum allowable dullness is 0.004” which is about the thickness of a piece of paper.

when_to_sharpen-1.gif

when_to_sharpen-2.gif

when_to_sharpen-3.gif

The rounded tip can be thought of as part of a circle. The radius of the tip is the radius of that circle.

when_to_sharpen-4.gif

when_to_sharpen-5.gif

The radius is shown by dotted lines A and B. If the radius is 0.008” then the diameter is 0.016” as shown in the right hand drawing. 0.016” is about the diameter of a common paper clip.

Typical edge radius on new saw blades


Edge Radius

Edge Radius

Edge Radius

Saw Tip Material

Microns

Ave. Inches

Ave. Inches

Cermets

3 - 4 micron radius

0.00013”

13 / 100,000

PCD – Poly Crystalline Diamonds

4 - 6 micron radius

0.00020”

20 / 100,000

Micrograin carbide or Stellite®

8 -12 micron radius

0.00044”

44 / 100,000

Sharpened carbide sawmill sawblade

10 – 18 micron radius

0.00055”

55 / 100,000

Don’t run your blades too long. The longer you run them the more that has to be ground off to get the saw tips sharp. See our section on Saw Blade Sharpening.

when_to_sharpen-6.gif

If a saw blade should run 10 hours and have 10% wear when it is run twenty hours it will have 30% wear. All this depends on the materials, machine, saw blade, etc. But it is always true that dulling is not a linear process. The duller a tool is the faster it gets even duller. In addition dull saw blades are much more likely to lose teeth, which is expensive, and much more likely to have shoulders rip off which is really expensive.

A good shop will help you determine how long to run your tools and will be able to tell you why.

Source by carbideprocessors.com

Monday, November 15, 2010

How to Sharpen a Circular Saw Blade

Knowing how to properly sharpen a circular saw blade is not just important to the life and quality of your blade, but also for your safety and the safety of others who use your equipment. A saw blade sharpener is needed to properly sharpen a circular saw blade, and can be purchased at many saw equipment retailers.

  1. Secure the saw blade into the saw sharpener. This is done by putting it onto the rod that sticks out from the sharpener and screw the nut over the top of it to hold it in place. This allows you to spin the blade as you go through and sharpen it. This will be done with the diamond blade that is part of the sharpener, though it will probably need to be purchased separately.
  2. Turn the machine on and bring the diamond blade up to the saw blade. You want to make sure the bevel matches up, which usually occurs at a 10-degree bevel. You want to sharpen every other tooth. Make sure to only sharpen it to just the 10-degree bevel and not lose height from the blade.
  3. Move the machine head to form a 10-degree bevel the opposite direction and go through and sharpen the blades you passed over the first time. This is the proper way to sharpen a circular saw blade.
  4. Use common sense and safety practices. Wear a mask to avoid breathing in the fine particulates that will come off during the sharpening process. You also want to make sure you are familiar with the piece of sharpening equipment, this will prevent injuries from happening. You need to use the same caution you would while using the blade in action.
Source : http://www.ehow.com/


Related Posts Plugin for WordPress, Blogger...